
- Version
- 4.5 Build 4501
- Studio or maker
- Imagenomic
- Languages
- English
- Activation
- K'ed by TNT team
- Runs on macOS
- macOS 13 or later
- Chip type
- Apple Silicon, Intel 64-bit
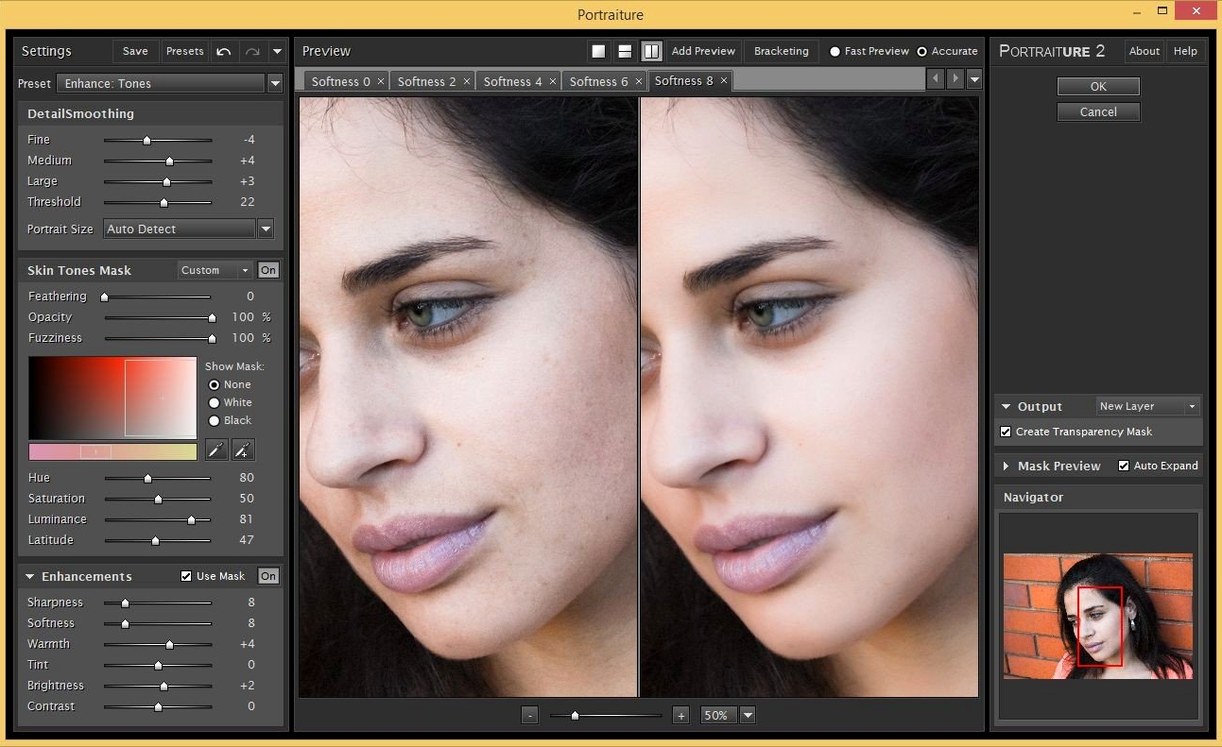
Portraiture 4.5 build 4501 is a plugin that handles the tedious part of skin retouching: it detects skin tones and builds a mask for you, so you do not have to paint one by hand. The developer calls the smoothing engine a next-generation AI version, and the difference shows in how edges stay put while texture softens.
Hosts and compatibility
The product page lists separate downloads for Photoshop and Lightroom Classic, and Affinity is supported as well. Mac users need macOS 13 or later, and the plugin runs on both Intel and Apple Silicon machines. That covers most Macs from the last few years, including the M1 iMac I keep in the game club office.
Opens from your host and scans for skin regions
You open the plugin from within your host, and it scans the photo for skin regions. The mask is generated automatically, with controls for smoothness, sharpness, and opacity. For classroom portraits or quick edits, it cuts the masking work down to a few sliders. The English interface stays readable, and the installer is straightforward once Gatekeeper is dealt with.
One workflow I find myself walking through with colleagues is a simple four‑step portrait edit in Photoshop. Starting point: a headshot with visible skin texture and a few small blemishes. Open the image, then go to Filter > Imagenomic > Portraiture. The plugin scans the photo and shows a preview with the default mask — usually a magenta overlay on non‑skin areas. At this stage, the mask is your foundation.
Step one: check the mask
Look at edges — hairline, eyebrows, lips. If the mask bleeds into the eyes or the background, reduce the Threshold slider slightly until the mask hugs skin edges cleanly. If it misses patches of skin, increase the threshold. The goal is a mask that covers skin only, without hard edges crossing into detail you want to keep sharp.
Step two: adjust the smoothing
With the mask set, move to the main smoothness controls. I start with Smoothness around 20 and Sharpness at its default. The preview updates in real time. Drag smoothness up until texture looks even, but stop before the skin turns waxy. Then bring Sharpness back a little — maybe to 15 — to restore lost detail like pores or stubble. The two sliders balance each other, so small adjustments matter more than big jumps.
Step three: fine‑tune opacity
The Opacity slider controls how much of the effect shows through the mask. The mask stays in place, but the effect becomes subtler. That is the main advantage of automatic masking: you can dial back the effect without losing the edge protection.
Step four: apply and check
Click OK. The plugin applies the effect as a smart filter if you are in Photoshop, which means you can double‑click the filter name later to re‑edit any slider. That is a good habit — it keeps your options open. If a section looks over‑smoothed, you can paint on the smart filter’s mask with a black brush to hide the effect there.
Event photographers cut masking time on hundreds of portraits
Portraiture fits several kinds of Mac users, but three groups benefit most directly.
Event photographers who shoot hundreds of portraits per session — school picture days, weddings, corporate headshots. The time saved on manual masking adds up fast. A batch of fifty portraits that might take two hours of careful layer masking can be handled in thirty minutes with consistent results.
Portrait and family photographers who deliver edited images to clients. They need a predictable look across a set of photos, and the plugin’s automatic mask gives that consistency. Once the settings suit their style, they can apply them to every shot in a series without re‑masking each one.
Photoshop users who dislike painting masks — maybe they work on a trackpad or a small screen, or they simply prefer adjusting sliders over brushing selections. Portraiture removes that manual step, letting them focus on colour, composition, and overall tonal adjustments instead.
Mask ignores parts of the face? Check the threshold
Even a well‑behaved plugin can throw up a few bumps. Here are the ones I hear about most often.
The mask ignores parts of the face. If the plugin misses a cheek or an ear, the threshold is probably too low. Raise it gradually until the mask covers the missing area. If that causes the mask to spill into the background, try adjusting the Detail slider instead — it affects how fine textures are treated, which can pull in missed spots without expanding the mask beyond the skin.
The effect looks plastic or overdone. This usually means smoothness is too high or sharpness too low. Reset the sliders to their defaults, then increase smoothness by small increments — five points at a time — while watching the preview. When you see the skin soften, stop and add a little sharpness back. The AI engine in build 4501 tends to preserve edges better than earlier versions, so you may not need as much smoothing as you expect.
Gatekeeper blocks the installer. The installer is signed but may still trigger macOS security. Mount the disk image, then open a terminal window and run the command to allow the installer through. After that, run the installer normally. It is a one‑time step, and the plugin works without further macOS warnings once installed.
The plugin does not appear in the filter menu. After installation, restart Photoshop or Lightroom Classic. If the filter still does not show, check the plugin folder location in your host application’s preferences. The installer places files in the correct folder automatically, but a permissions issue can prevent them from loading. Re‑running the installer with the same command should resolve it.
A real‑world scenario: school portrait day
Ute runs a part‑time photography business from her home in Bremen. Every autumn she shoots the entire student body of a local primary school — about 400 children over two days. She uses a MacBook Air and Photoshop. Before Portraiture, she spent hours painting layer masks on each portrait because children’s skin varies so much: some have freckles, some have rosy cheeks, some have scraped knees. Her old method was a mask on every image, which meant late nights and inconsistent results.
Now she opens each portrait in Photoshop, runs Portraiture with a preset she dialed in after the first few images, and checks the mask. The AI engine handles freckles and redness without removing them entirely — just smoothing the overall texture. She adjusts the opacity per image if a child’s skin needs more or less correction. Each portrait takes under a minute. The final set has a uniform look, and her editing time dropped from six hours to two. She says the biggest improvement is not the speed, though that helps. It is that she does not second‑guess her masking anymore. The plugin does it, and she trusts it.
- Build number 4501.
- The AI smoothing engine is described as a next-generation version.
- macOS 13 or later
- Intel or Apple Silicon
- English interface
Questions I keep getting
Which Adobe programs does Portraiture work with?
The plugin has separate builds for Photoshop and Lightroom Classic, and it also supports Affinity.
What macOS version do I need?
The plugin requires macOS 13 or later, and it runs on both Intel and Apple Silicon Macs.
Does Portraiture still need manual masking?
No, it detects skin tones and creates the mask automatically, so you can skip the selective masking work.
How to install
- Mount the disk image and open it. Gatekeeper will try to block the installer, so you will need the next step.
- Open Terminal and press Enter to let the installer run. This tells macOS to allow unsigned software from this disk.
- Run the installer and follow the standard steps. Choose the host you want the plugin for when asked.
- Launch Photoshop, Lightroom Classic, or Affinity afterward. The plugin appears in the usual filter or extension menu.
Similar apps





Sign in or join the club to leave a comment.
Nobody has commented yet.